Finally able to sort out the technicalities of your business? It’s time to make it official and register with the Bureau of Internal Revenue (BIR).
This is a crucial step before launching your business as it will ensure your compliance with tax regulations. It’ll also establish the legitimacy of your business in the eyes of the government and, of course, your potential customers.
This article will show you the steps to take when registering your business with the BIR, as well as renewing it online.
Also read: 8 Government Programs for Micro-Businesses and SMEs.
Why is it important to register your business with the BIR?
This step is a legal requirement that has several advantages. When you register, you’re legitimizing your business operations, which will provide a sense of credibility and trustworthiness to your potential clients and partners.
It will also help you stay compliant with your tax obligations, helping and aiding the country’s development with your tax contributions.
Lastly, a BIR registration gives you benefits, such as the ability to issue official receipts and invoices, which are needed for lawful transactions and will protect your business from financial mismanagement.

avoid problems in the future.
Are online businesses required to register with the BIR?
The simple answer is yes. Since Filipinos love online shopping on multiple and diverse platforms, there has been a remarkable rise in the number of online businesses.
According to Revenue Memorandum Circular No. 60-2020, anyone doing business or earning income in any manner or form, including those that make money online, or sell products or services, is required to be registered with BIR.
Also, covering this step holds online businesses to the same standards as those stores and brands with physical branches. This is to foster a fair business environment for all.
#NinjaTip: Your online business needs the right courier partner sa simula pa lang. As a Ninja Van VIP Shipper, get special shipping rates, rebates, fast COD remittances and more perks to optimize your business and cut your costs. Be a VIP Shipper today!
BIR online registration for business: A step-by-step guide
A BIR business registration is now made easier and more accessible online. All you need to do is grab a computer or laptop, follow these simple steps, and you’ll be done in no time.
1. Prepare all necessary documents
There are preliminary requirements before you can get a business permit from the BIR.
The basics are:
- DTI Certificate of Registration
- Barangay Business Clearance
- Mayor’s Permit
- Certificate of Lease (if the place is rented) or Certificate of Land Title (if owned)
There’s a full list of requirements indicated on the BIR website that are unique to every type of business: whether you’re a sole proprietor, cooperative, association, corporation or partnership.
You’ll submit all documents in PDF files via email.
Here’s a step-by-step guide on Getting a DTI Business Permit Online.
2. Accomplish BIR application form
Download and fill out the BIR form to start your registration. Again the accomplished form will be scanned and saved as a PDF file for submission via email:
- Accomplish BIR Form 1901 for Sole Proprietorships
- Accomplish BIR Form 1903 for Corporations and Partnerships
3. Determine filing and payment obligations.
On the BIR website, download the tax questionnaire to determine the applicable tax liabilities for your business. After filling it up, scan the document and attach it to your email application.

4. Pay the Registration Fee and Documentary Stamp Tax
Pay P500 for the registration fee and P30 for the loose Documentary Stamp Tax via the various ePayment channels of BIR.
You may choose to pay via LandBank, UnionBank, DBP, PESONet, GCash, Paymaya, and many other payment options available.
For applicants without a Tax Identification Number (TIN) yet, you will have to wait for an email from the BIR on when you may settle the fees. You will pay at the New Business Registrant Counter at the Revenue District Office (RDO) upon pickup of your Certificate of Registration.
5. Send your application via email
With all the files and payment ready, it’s now time to send your application:
- Visit the BIR portal to determine the right Revenue District Office (RDO) where you’ll send your application. You will provide information such as your city, province, or municipality where your business is located.
- Once you have provided all the necessary details, you will see the correct email address to send your application to and the correct format for your email subject.
- Attach all required documents in the email and submit to the email address of the concerned RDO. Total file size of all attachments should not exceed 4MB.
You will receive a confirmation email upon receipt of your application. If all your documents are in order, expect to get your Certificate of Registration in three (3) working days.
6. Pick up your Certificate of Registration
Once you have received the email containing information on the date and time of pickup, you may proceed to the correct BIR branch to finish the process.
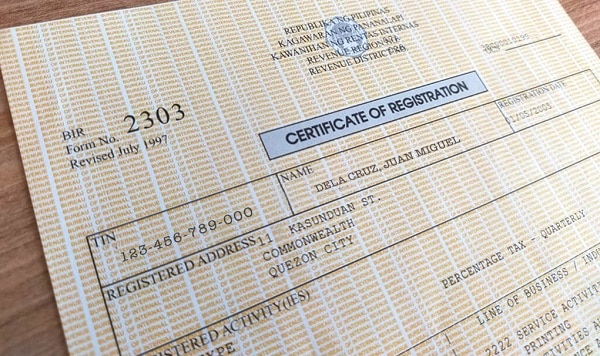
This document now serves as proof of your business’s legitimacy. If applicable, you will also receive information regarding buying BIR Printed Receipts or Invoices, or the Authority to Print.

How to renew BIR business registration online
You can also renew your BIR permit online. Note that your permit requires annual renewal and you’ll have until January 31 of the following year to do it.
Here’s a quick guide on renewing your BIR business registration:
1. Log in to eBIR forms and fill up the required information
You may download the eBIR app from the BIR website and install it on your device. Once installed and opened, you will be asked to provide information that matches the ones on your Certificate of Registration or Form 2303.
Make sure to input your latest contact information and email address to properly receive confirmation and communication from BIR.
2. Select BIR Form 0605 from the list of BIR forms
This is the form for all renewals. Fill up the needed information once again. Make sure to always save a PDF copy of your forms for safekeeping in case of an audit.
When you’re done with the form, click ‘Validate’ to check if you’ve covered everything. Then, click ‘Submit’ once done.
3. Wait for the email confirmation
You should receive an email confirmation that indicates you have successfully started your BIR renewal process.
Again, it is recommended to save a PDF copy of your email confirmation as this will serve as proof that you have updated your renewal.
4. Pay the required fees
You may proceed to pay your tax dues. Of course, the easiest option is online via BIR’s ePayment channels or e-wallets.
Start your business right
It’s normal to feel excited and at the same time, overwhelmed when starting your own business.

and tax obligations keep your business secure from any legal issues in the future.
Keep in mind that going through these processes is a crucial step to keeping your business credible, reliable, and trustworthy in the eyes of your customers and partners.
With business registration comes certain advantages and perks as well. By following the outlined steps in this article, you can easily navigate the BIR registration and renewal processes with ease.
More tips to guide your new online business:
What Are Your Tax Obligations as an Online Seller?
Take Note of These Tax Exemptions for MSMEs
Solo Parent Govt. Benefits You Should Know


